Choosing The Right Natural Stone Benchtop

Calacatta marble kitchen

When it comes to turning your kitchen into a functional and stylish room of your home, nothing beats natural stone kitchen benchtops.

However, there are a variety of fantastic and beautiful options of natural stone.

Choosing the right natural stone benchtop for your kitchen involves balancing aesthetics, functionality, and maintenance – but ultimately it comes down to personal preference and priorities. 

With various options available here at Euro Marble, let’s take the time to discover the characteristics, advantages, and disadvantages of each type of natural stone that can help you make an informed decision.

What to Consider When Choosing a Benchtop

When selecting a natural stone benchtop, there are a number of factors to bear in mind.

1. How do you use your benchtop?

Everyone cooks, lives and entertains differently. Kitchens are always busy areas of the home, but if you frequently cook and often entertain you might want to consider prioritises durability when considering different stone types. Some natural stones are more resistant to heat and scratches than others.

2. What is your interior design aesthetic?

Fortunately, natural stone comes in as wide a range of colours, shades and styles as you could hope for. Consider the rest of your home and the type of style you want to bring out in your kitchen. Whether you want a bold statement piece for your natural stone benchtop or something more subtle and minimalistic, that is all up to you.

3. What ongoing maintenance requirements suit you?

Different types of stone require different levels of care. Some types of natural stone, such as marble, may need regular sealing or specific cleaning products, while others are a little hardier in that department.

4. What is your budget?

Natural stone is generally more expensive than some other kitchen benchtop material options. But when it comes to durability and longevity, the investment in your home is worth it. Nevertheless, it is still important to consider what your budget is for your natural stone benchtop, as different stone types attract different price tags.

Breaking Down the Different Options for your Stone Kitchen Benchtop

Marble Natural stone benchtops

Marble

Marble is one of the most luxurious looking materials available – with iconic off-white shading and unique veining. On the functional side of things, marble is highly heat resistant which is a good quality for the kitchen.

However, compared with other types of natural stone, marble is relatively porous. This means it can be more prone to staining, require regular resealing, be softer and more susceptible to scratches, and require a little more maintenance than other options.

Granite Benchtop Euromarble

Granite

Granite is a unique looking stone with its granular aesthetic bringing a highly intricate texture to any kitchen. This natural stone is extremely durable, scratch and heat resistant, and only requires minimal ongoing maintenance.

However, like marble, granite is relatively porous, so using it for your natural stone benchtop may mean you need to periodically seal it and protect it from spilled liquid stains.

Limestone

Limestone is a fantastic stone kitchen benchtop option thanks to its warm and rustic look. If you are looking for a stone to complement a traditional design, this durable natural stone is a great option.

Limestone is, however, softer than granite and can therefore be more prone to scratches, damage and chipping – especially if subjected to high levels of activity. It is also best practice to regularly reseal your limestone kitchen benchtop to prevent staining.

Travertine

Travertine, like limestone, brings a unique texture and visual character to a kitchen space. It is quite a durable material with the proper care, but can be susceptible to staining – especially without regular professional resealing.

Again, like limestone, travertine is one of the softer types of natural stone and therefore can be prone to scratches if not properly cared for.

Onyx

Onyx is a fantastic option of natural stone kitchen benchtop for anyone wanting a bold, striking visual appeal – thanks to its colouring and striking patterns. It is particularly well suited for anyone wanting to create a backlit effect.

Onyx is quite a soft stone and can be prone to scratches, so kitchens subjected to a high level of activity may not be suited to it. This natural stone also requires significant maintenance and care to keep it looking a treat.

Quartzite kitchen benchtops

Quartzite

Quartzite functions as amazingly as it looks. With similar aesthetics to marble, this stone is highly popular for use in kitchen stone benchtops. However, unlike marble, it is among the more hardy and durable types of stone and is very resistant to scratches and heat.

Quartzite is among the more expensive of stones though, thanks to its rarity and the difficulty of extracting the stone. Additionally, for best functionality and appearance, it is still recommended that you regularly reseal it. 

Find the Perfect Natural Stone Benchtop at Euro Marble

Our team of natural stone experts and enthusiasts at Euro Marble are always here to help.

Come on in to our showroom or give our team a call and we can step you through all the different considerations and options to find the right natural stone for your kitchen, your needs, budgets and priorities. 

How to Clean Tile Grout Naturally

tiles

If you’re wondering how to clean grout from your tiles in a natural, simple and easy way – you’ve come to the right place.

Cleaning tile grout doesn’t need to include the use of harsh chemicals or require an investment in specialist equipment. In fact, both of those suggestions are at best a waste of time and money and at worst damaging for your tiles.

Nevertheless, tile grout is something that does need cleaning. That’s why we’re going to explore some natural and gentle ways in which you can preserve the natural beauty of your stone tiles with natural grout cleaner materials and methods.

Cleaning Tile Grout

Grout is the dense fluid that is used to fill the gaps between the stone tiles on the floor and walls of your home. In addition to providing the necessary adhesive strength to keep your tiles in place, grout also contributes to the visual appeal of your floor or walls.

That’s why keeping your tile grout cleaned and sparkling is important. Dirty grout left to accumulate over time can detract from the aesthetic of your space and the visual appeal of your home. 

When Do You Need a Tile Grout Cleaner

In most applications the grout used in tiles is light in colour and porous in material. There are good reasons for this. Dark grout can crowd out the beauty of your stone tiles and non-porous grout may not be as pliable in application.

But there is a down side as well: It makes it more prone to staining. When we say staining we’re not just talking about spills by the way. Dirt, debris, mould and soap can all build up between stone tiles and discoulour them quite visibly over time.

When you notice the grout starting to get darker and, to be honest, uglier it might be time to learn how to clean your grout. 

How to Clean Grout Naturally

Cleaning grout doesn’t have to be overly expensive, time consuming or energy consuming. In fact, there are natural ways to clean your tile grout with basic household cleaning materials and some simple instructions.

Basic Tile Grout Cleaning guide

Step 1 – Water

Grab a cup or a bucket and make sure that it is clean. Then fill it up with lukewarm water – cold water won’t be as effective and hot water can be damaging.

Step 2 – Baking Soda

Add enough baking soda to make the water thicker in consistency but not enough that it becomes gluggy or ruins its viscosity.

Step 3 – Dish Soap

Add a small amount of natural dishwashing soap. Any natural soap will do as long as it does not have a high acidity level.

Step 4 – Mix

This one is self explanatory really. Just mix the above concoction until the ingredients blend.

Some people like to add a small amount of vinegar when cleaning grout between non-natural stone tiles. We strongly recommend you seek advice from your stone manufacturer or supplier before applying vinegar and avoid vinegar for natural stone grout.

Step 5 – Apply

Apply the water-baking soda-soap mixture to the grout. There’s no need to soak the groat but ensure that the stained, dirty sections of the grout are all subjected to the mix.

We recommend using a spray bottle to gently apply the warm water and soap to the tile’s grout. 

Step 6 – Scrub

When we say scrub, we actually mean to gently scrub. You don’t want to scrape away or degrade the grout in your efforts to clean it.

Pro tip: Scrub the grout in as circular a motion as possible. Scrubbing back and forth or up and down can damage the grout. 

Step 7 – Rest

Let your grout and mixture sit still for a few minutes and take the opportunity to rest yourself.

Step 8 – Check

Have a look at the grout. More stubborn and persistent stains and dirt might need another round of mixture and scrubbing.

Is the stain still there?

If the stain or dirt is proving tougher than anticipated, you may need to adjust your cleaning mixture. Adding some more natural, non-acidic soap may help. For non-natural stone, you may want to consider adding some more vinegar depending on the application. 

Is the stain just not going away?

For deeply embedded stains, a more thorough approach may be needed.

Option 1

First and foremost, make sure to seek professional cleaning advice. Once you’ve got the a-OK from your supplier to use bleach, use a small amount of hydrogen peroxide in your warm water and baking soda mixture. 

Option 2

Alternatively, and this requires a bit more time, skill and investment, you can carefully scrape off the top layer of your tile grout using a specialised grout knife tool. 

You will need to then apply a grout sealer afterward to protect it from further dirt, staining and damage.

Step 9 – Wipe

Take a soft sponge and wipe the excess mixture from the grout and tiles.

Step 10 – Dry

Now, step back and let the tile grout dry completely. 

Tips for Cleaning Grout

  • Always let the floors and walls dry properly before assessing the grout.
  • Clean your tiles regularly with non-damaging cleaners.
  • Always vacuum your floors before mopping to prevent the dirt from soaking into the grout between tiles.
  • Get your grout professionally sealed and resealed regularly. 
  • Avoid harsh chemicals, materials with high levels of acidity and abrasive substances. 
  • Do not use vinegar or bleach on natural tiles.
  • Always patch test your cleaning solution in a small, inconspicuous area to ensure that it does not worsen the discolouration or damage. 
  • Avoid hard-bristled brushes, steel wool and other abrasive tools. Be careful not to scrub too hard!

Speak to the Natural Stone Experts Today

Here at Euro Marble, we’re not just passionate about sourcing the best quality, most visually dazzling natural stone slabs from around the world. We’re also experts in ongoing maintenance and cleaning of natural stone and tile grout. 

So, if you have any questions before getting started cleaning your grout, make sure to give us a call today.

Kitchen Layouts: A Complete Guide

kitchen tamil king

The kitchen layout in your home is very important for determining more than just the aesthetics of the space. Kitchens are one area of the home that is bound to see a lot of activity and traffic, so the layout needs to be suitably functional and practical for everyday use.

Whether your kitchen space is compact and small or open and large, there are a number of ways in which the layout can make or break the usability of the space. From the placement of certain features to the height and length of your benchtop, there’s certainly a lot to consider. In this article, we’ll help you understand the basics of kitchen design layouts and provide some ideas to help inspire you.

Understanding the Basics of a Kitchen Layout

The Work Triangle

One of the most commonly known principles of a kitchen layout is the ‘Work Triangle’. The theory behind this principle is that there should be a clear, unobstructed and ergonomic space that allows for easy access to the three mainstays of food preparation:

  • The stove top
  • The sink
  • The refrigerator

The space between these three parts forms the kitchen triangle. While by no means a law, this kitchen layout idea serves to ensure easy movement and a foundation from which you can build out the rest of your kitchen design.

Depending on how well you wish to conform to the Work Triangle, there are certain other considerations to take into account, such as ensuring there are no appliances or cabinets that intersect the ‘legs’ of the Triangle, and ensuring that each side of the Triangle does not exceed 2.7 metres. While the motivation behind the triangle is important, at the end of the day you need to go with what works for you.

Kitchen Zones

Another way to approach your kitchen design layout is to focus on the different zones of the kitchen. 

In this instance, a zone refers to a specific space which is dedicated to completing a particular kitchen-based task. For example, the sink may be primarily dedicated to washing up dishes etc. Your benchtop is designed for food chopping and mixing. 

This important point here is to focus on each particular zone to ensure that there is sufficient space and working area to complete the relevant task. Additionally, you’ll want the appliances and cabinetry related to that task to be close at hand. For example, your bin should be close to the space where you’ll be chopping vegetables. 

Every zone needs to work and function in a way that complements you and your family. Working from zone to zone to ensure each aspect of the kitchen is optimised is a handy and systematic way to go without getting too overwhelmed.

Space Planning

Planning how to use the space in your kitchen is certainly a balancing act but it’s an integral part of the kitchen layout design. If your kitchen is compact and tight you might be tempted by maximising your storage with cabinets and cupboards, but this will impact your ability to incorporate a kitchen island or certain layouts (more on this soon).

Your kitchen layout needs breathing space not just from a visual point of view but also practically speaking. Think about who will be accessing the space and when? What will you be doing and is there enough room to move around while you’re busy prepping and cleaning?

Ideally, keeping a minimum of 1 metre space between walls or cabinets is ideal while anything more than 3 metres is likely to be an under-utilisation of space. Of course, there are no hard and fast rules and you’ll need to think about what works for you and your home.

Kitchen Layout Ideas

Single Wall

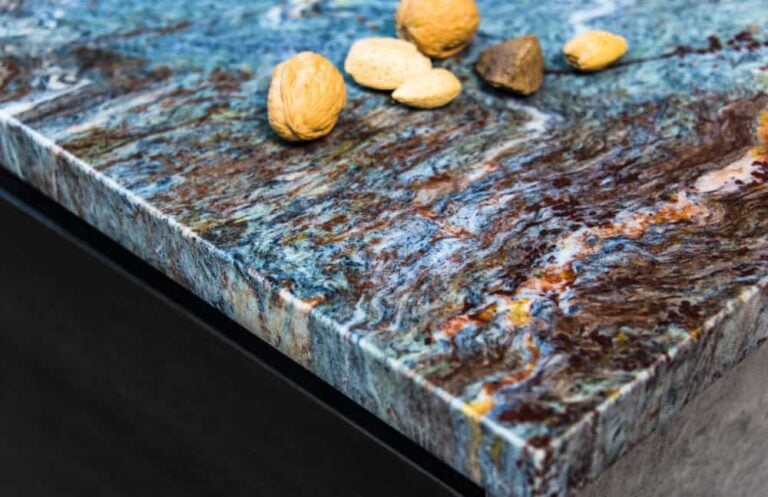
A one-wall kitchen is a simple layout design and can be used to great effect with vertical storage and cabinetry. Of course, the Work Triangle may not be possible, but there’s still no reason why consideration can’t be put into the layout of your oven, fridge and sink to ensure intuitive movement when you’re busy hustling up and down. Tip: think bright tiling or natural stone to help brighten and add visual space to the area, such as Blue Roma Quartzite.

Island Kitchen

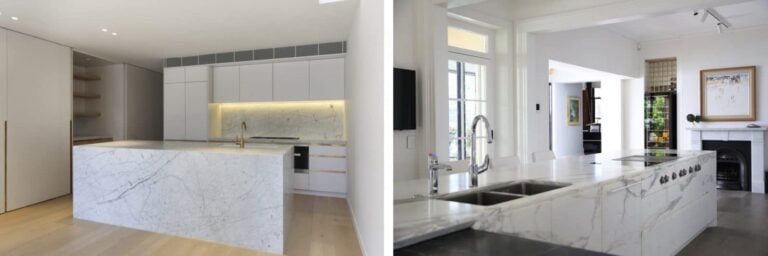
If your kitchen is open plan, an island offers a practical and large work surface. Without boxing in your kitchen layout, a beautiful island can be practical and visually pleasing. Whether you incorporate other features, such as a sink or bar fridge, into your kitchen island is really up to you. Remember to consider where your other zones are located, however, to ensure that the island adds to the natural flow of movement and traffic in the kitchen.

There are plenty of choices for benchtop materials, including the hardy yet still stunning marble natural stone. Check out our Concordia Marble and New York Marble for classic yet stunning kitchen benchtop options.

Galley Style

The Galley Kitchen refers to two rows of cabinetry facing each other; think of it like a mirror-image of the single walled kitchen. This economical kitchen design layout allows you to make the most of the space for storage and appliances while having slightly more flexibility with regards to where everything can go. One tip for making the most of each centimetre of space while still ensuring ease-of-movement is to have all of the work areas on the one side with all of the storage and other appliances on the other.

The Letter-shaped Kitchens

Among the many kitchen layout options you have, especially if building a kitchen from scratch, are the ‘letter shapes’. Each of these layout ideas come with their own pros and cons, so it’s worth thinking about what sort of size space you want and how you plan on using your kitchen.

L-shape kitchen – This layout offers enormous flexibility in how you set up your Work Triangle and zones. Plus, the creation of a corner offers unique storage opportunities as well as the extended kitchen bench which can be used for meal preparation or a breakfast bar!

U-shape kitchen – This kitchen layout is wonderful for large and open-spaced kitchens that require plenty of storage for many appliances. You can pack as much utility as you want into the three sides without affecting the Work Triangle in the middle.

G-shape kitchen – This layout offers much of the space of the U-shaped kitchen but with some highly practical extra benchtop space. While you may sacrifice some of the openness, you’ll find plenty of food preparation space to help you get meals ready to go. Plus, the extra cabinetry will absolutely not go amiss!

Let’s Talk More Kitchen Layout Ideas Today

If you’re still unsure about which kitchen layout is right for you, or you know what you’re looking for and are ready to find stunning natural stone slabs to incorporate, make sure to reach out to our team here at Euro Marble today to discuss all things kitchen layouts!

Choosing Kitchen Sinks & Tapware For Your Kitchen

Residential2

When it comes to designing your kitchen, you’ve probably given a lot of thought to the larger aspects of the space such as the countertop and layout. However, taking the time and expending the effort to choose the right kitchen sinks and tapware for your kitchen is just as important.

Your sink and tap are some of the most frequently used parts of the kitchen but there’s a lot more to these humble features than just their utility. Despite being understated, choosing the right material and design that complements the overall aesthetic of your kitchen and home can really go a long way to bringing your interior design together.

To help you, we’ll run through the basics in kitchen sinks and tapware.

Flush mount vs undermount sink – the types of kitchen sinks available

Inset sink

If you’re operating on a budget and are happy to go with the simplest and most commonly used option, an inset sink is ideal. Affordable, practical and durable, the standard inset sink is set into the countertop. The tapware can be mounted to the sink itself or to an adjoining surface. There are a variety of sink rim designs to choose from, including bevel edges or raised rims, depending on your personal preference.

Undermount sink

The undermount sink is similar to the inset sink in many ways but is tucked further under the surface of the benchtop. This gives the entire look a cleaner, minimalist and more streamlined aesthetic, if that’s your preference. There are practical elements as well to the undermount sink as you can more easily wipe liquid or spills into the bowl, but other considerations such as drainage and the likelihood of chipping are also important to think about. 

Flush mount sink

There is some confusion when comparing flush mount sinks vs undermount sinks. In essence, the undermount sink is placed into the countertop with an opening cut out from it. The flush mount, on the other hand, does not get installed into a cut hole but directly onto the top of the counter surface. This allows for a sleeker look but does make replacing the countertop sometime in the future more complicated. Flush mount sinks are also generally more expensive to purchase and when it comes to installation due to the complexity. 

Material Options for Sinks

Sinks, basins and vanities are available in a variety of materials, each with their pros and cons. 

Enamel

Enamel-finished sinks are quite easy to clean and maintain which makes them practical and provide a variety of options of finishes. However, they can be heavy and require additional reinforced cabinetry, plus the enamel can be worn away over time.

Stainless steel

A stainless steel sink offers many practical benefits. It’s hygienic, durable and among the cheaper of options. Apart from the metallic aesthetic of stainless steel, some sinks can be prone to making a lot of noise with running water and low quality steel can become scratched with usage. 

Composite material

Composite materials are often made from a mixture of quartz, natural stone and resin. There are many reasons to choose a composite stone: from its durability to its stain resistant nature, but boiling water and water marks can be an issue. 

Brushed brass

A brushed brass sink can look fantastic in a number of rustically themed or country-styled kitchens and homes. Durable and easy to maintain, brushed brass is practical but it does come at a higher price point than other types of sinks. 

Natural stone

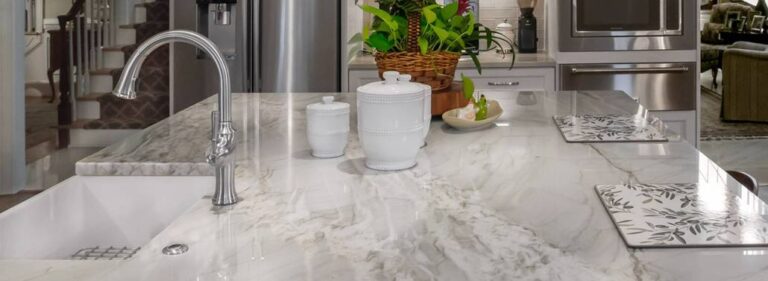
Natural stone is a popular and luxurious-looking option for sinks. There are a variety of options of natural stone available, such as granite, quartzite, travertine, onyx, and marble. There’s also plenty of aesthetic variety with colours and shading ranging from bluey-caramel with the Azul Macubas and light grey Tundra limestone to the pale pink and intricately veined Cristallo Rosa quartzite, and everything in between!

What to Consider with Tapware

The best kitchen tapware for your kitchen will depend a lot on your particular stylistic preferences, the overall aesthetic of your bathroom and the general layout of your sink.

Matching your kitchen sinks

The first thing to consider with your tapware is what will match your sinks. While bought separately, there is often wide enough choice available that you can find taps to match just about any sink. Consider both the design, colour, shape and size when you’re looking to match the sink with the tapware. 

Choose your style

Do you prefer a single lever mixer that will sit in the middle of your sink? Do you want a tap that sits to the right or left? Does it need to accommodate a soap dispenser of some description? Take the time to consider how you plan on using the tap and how the style being considered will complement your activity in and around the sink. 

Height and size

Apart from needing a tap that can be installed physically and is compatible with your sink, taps, faucets and spouts come in all heights and sizes. There is no size that suits everyone’s ergonomics or preferences. So take the time to think about the functionality of any tap in consideration. 

Look around the sink

Due to the fact that every kitchen is different and the layout and cabinetry are different, make sure to think about the area surrounding your sink as well. Low hanging cabinets, electrical appliances and a variety of other factors can help you determine what type of tap is right for you. 

Explore Stone Kitchen Sinks and Tapware at Euro Marble

Euro Marble is a leading supplier of the highest quality of natural stone in Australia. If you’re considering different types of kitchen sinks and accompanying tapware, make sure to come into our showroom or contact us today to find out just how gorgeous and practical a natural stone sink can be for you!